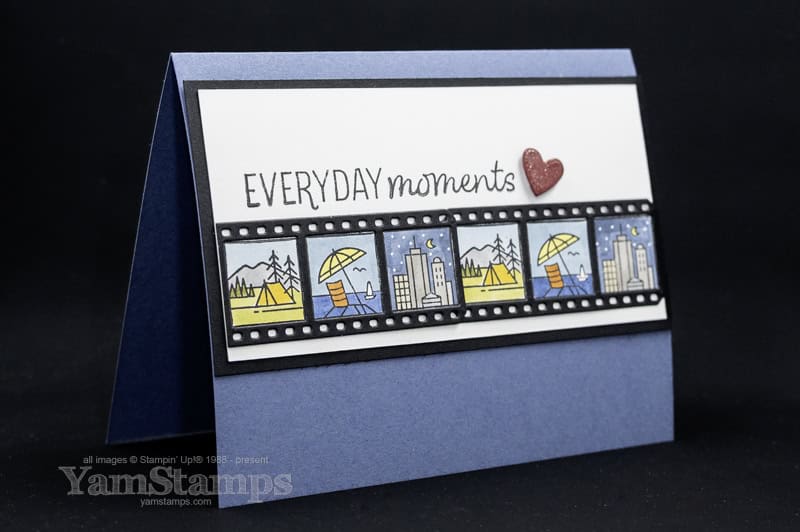
In honour of Nature Photography Day, I’m sharing a nature-inspired project featuring the Capturing Smiles stamp set.
I tend to take a lot of photos of cards and marching bands these days (okay, one band primarily: the Burlington Teen Tour Band), but I still appreciate the beauty that can be found outdoors. This card uses the Capturing Smiles stamp set to create a collection of nature-inspired scenes (and okay, there’s a cityscape in there too!).
One of the things I enjoy about this design is that it can be customized in many different ways. Change the colours, swap the scenes, or adapt the layout to suit your own style.
The scenes are coloured with Stampin’ Blends so it’s still easy and impressive, even though it may take a bit longer to create than some of the cards and tutorials I share.
I’ve made the tutorial available as a free downloadable PDF. Simply click the link below to download the instructions and create your own version of this project.
A card that looks polished and impressive… but secretly comes together without too much fuss.
I created this card for a recent Demonstrator-Only card swap featuring products from the May-August Catalogue (which goes live to customers on Tuesday May 5!).
If you’ve ever wanted to create something that feels finished, but still works on a lower-energy crafting day, this design is one to keep in your back pocket.
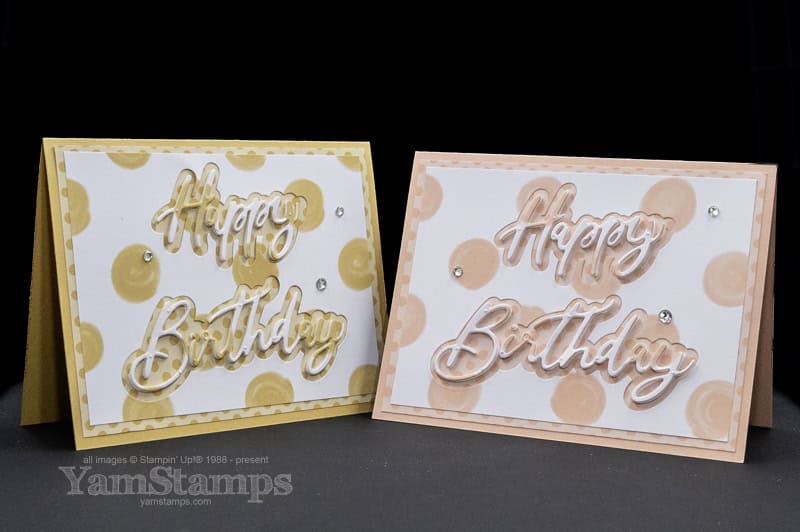
Today’s project uses Golden Glow, Crisp Cantaloupe, and the 2026–2028 In Color Painted Patterns DSP to create a coordinated layered birthday card. There’s a fully linked supply list on the YamStamps Sunday Swaps Page, but please note that the links to the items in the May-August catalogue won’t work until May 5th! Also – while it goes against everything I learned in grade school, I use “Color” because that’s how the product is labelled….
The background is created using a single sheet of Designer Series Paper! The small dot pattern is one side of the sheet, and the large dots are on the other. One 4″ x 12″ strip will create one cardfront so it’s easy to create a few of these cards at the same time.
Let the Thrifty Sentiment Be in the Spotlight
The Words & Wishes Dies really shine in this design, particularly because they are popped up on a Foam Sheet. Thrify crafting for the win – and super coordinated flow. After I die cut the background from the large dot DSP, I stuck the cut outs onto a foam sheet and then die cut the sentiment from that. When you adhere the sentiment into the negative spaces, you’ll see how the pattern flows across the words and creates cohesion! The trickiest part of this project was making sure I didn’t lose the dot to the “i”…
HINT: In my experience, the large random dot pattern is a bit more forgiving than a smaller, more solid pattern, and circles are always more forgiving than hard edges like rectangles or stripes.
Add Just Enough Sparkle
Rhinestones are one of my most favourite all around accessory to add to a project. They catch the light, draw the eye in and give that finishing touch.
Application Hints:
Space them out
Create a loose visual triangle
My preference: odd numbers
One Design, Endless Variations
You may know this about me – but I don’t want to use up all my brain cells for crafting (typically I craft at the end of a work day so I don’t have many left over!!). With this one design, you can create so many looks – swap out the paper you use, swap out the colours for a whole new take. The Words & Wishes Dies have a number of coordinating sentiments and backdrops so you can swap out the sentiments as well!! That’s why I love card designs like this – paper crafting doesn’t have to be difficult to be impressive.
Your Turn
If you’ve been wanting a go-to birthday card that you can recreate without overthinking every step—this is a beautiful one to try.
Pull out your supplies, pick your colour, and give it a go.
And when you do:
Are you leaning Golden Glow or Crisp Cantaloupe?
Did you keep the background soft or go a little bolder?
Comment below, save this layout for later, or share your version—I’d love to see what you create.
Ends tomorrow – earn double the Stampin’ Rewards when you shop! Place an order of $25CAD or more by the end of April 17, earn twice the regular amount of Stampin’ Rewards that you can use against future orders! Sign into your online account, and make sure that you’ve opted in to Stampin’ Rewards to earn.
Shortcut to shopping in Canada is yamstamps.com/su or you can message me for assistance placing your order.
Pay no shipping fees on Stampin’ Up! Canada product orders of $100CAD (after any discounts/before taxes)! February 18-20 only!
Yes, you read that correctly – FREE shipping! Until February 20, pay no shipping costs if your order has $100CAD product! No code to enter, just add things to your cart at yamstamps.com/su and once you hit the threshold, there will be no shipping fees. Please be aware that any Bonus Days coupon codes that you use will affect the product total in your cart. The free shipping order threshold must be met AFTER any discounts and BEFORE any taxes.
If you have a smaller order and can pick up your order in Burlington, use the group code ZXWCZTFX . By using this group code, all the orders will be shipped to me in Burlington, and everyone will qualify for free shipping! By entering your own order into the system (but using the group code), you can earn Stampin’ Rewards (with minimum purchase) and you’ll be able to select your payment method. I will notify you once the order has arrived! I will close the order when the group total hits $100CAD or by end of day February 20th, whichever comes first.
Check out all that’s new and fresh for February in the Stampin’ Up! Canada sphere!
Good news is all around – Wiarton Willie predicted an early spring yesterday, and today, there’s new products and promotions for your crafting needs.
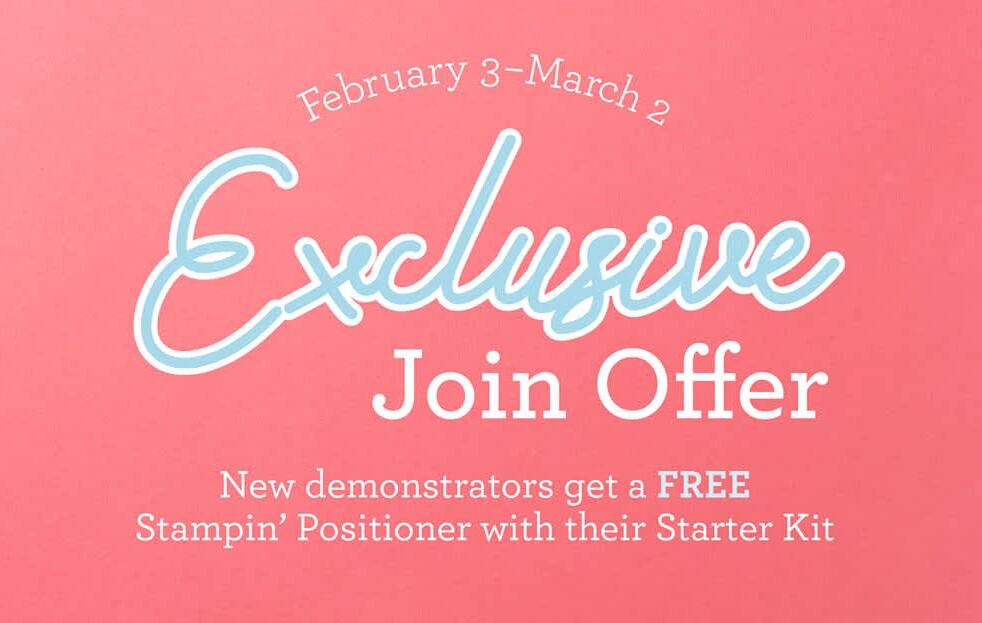
Free Stampin’ Positioner!
Exclusively available as part of a New Demonstrator Starter Kit! Get a FREE Stampin’ Positioner in your starter kit February 3 – March 2. Existing Demonstrators had the opportunity to buy one over the last couple of weeks, but now the only way to get one is in the starter kit.
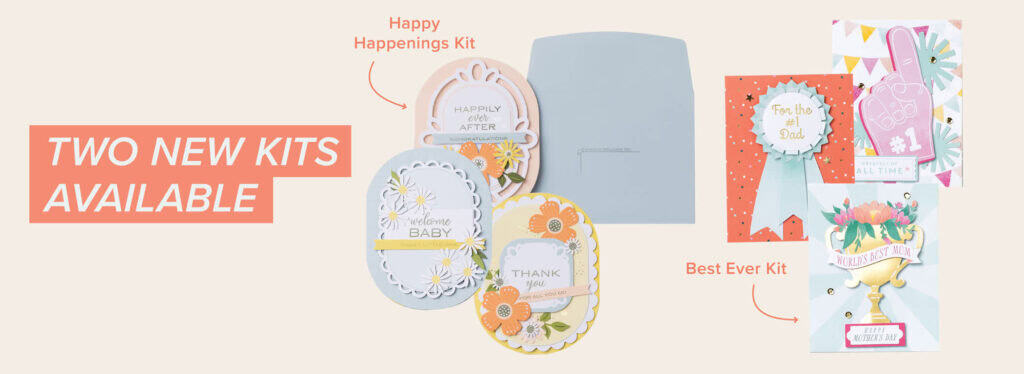
New Products Available! New Kits!
Two new crafting kits are available for purchase – Best Ever to reward your champions, and Happy Happenings to celebrate those happy occasions in life.
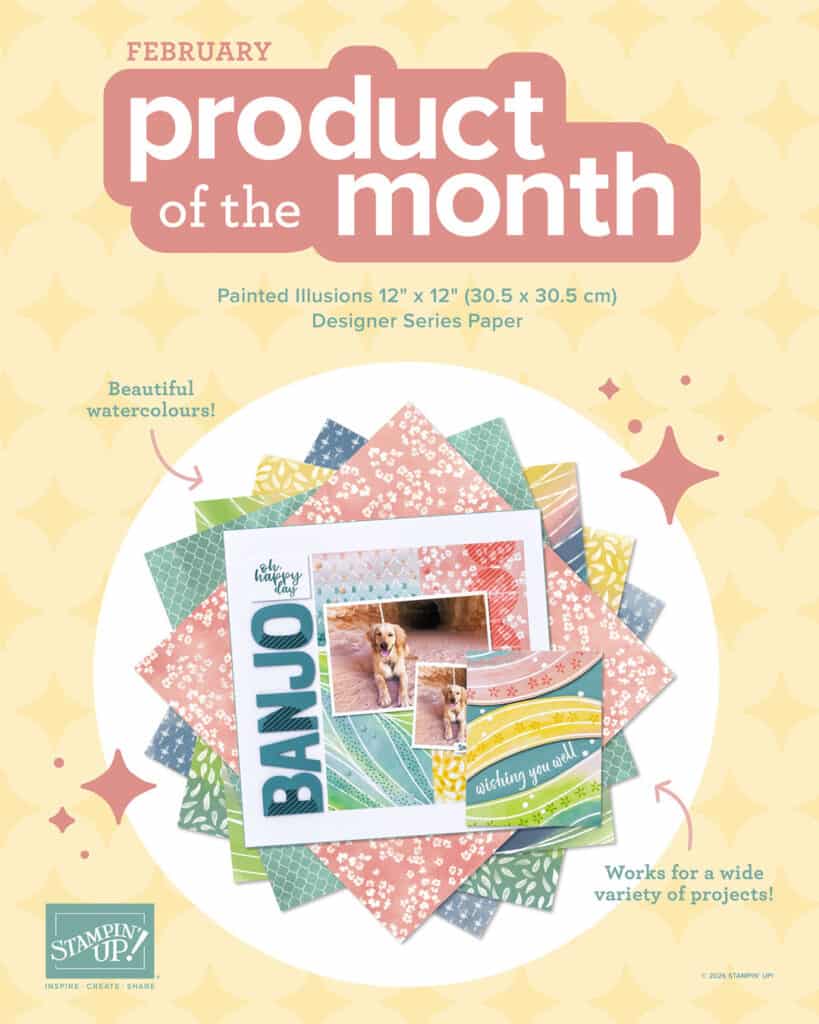
Place an order for $100CAD worth of product (AFTER your coupon codes are applied, and BEFORE shipping and taxes are added on) – and you are eligible to purchase the Product of the Month for just $5CAD! There’s a new Product of the Month available for February – the beautiful Painted Illusions Designer Series Paper!
A New Stampin’ Positioner—Only for New Demonstrators (Feb 3–March 2)
This Stampin’ Up! Canada starter kit special runs from February 3 – March 2. Luckily, they let existing Demonstrators pre-order this positioner — otherwise we’d all be trying to join again…
During this limited time special, anyone who joins Stampin’ Up! as a new demonstrator will receive an exclusive Stampin’ Positioner in their starter kit—at no additional cost. Though it will be available for purchase in a future catalogue, until then, the only way to get your hands on one of these is by getting a Starter Kit. The Stampin’ Positioner will make your stamping more accurate and less stressful (because who needs stress when you’re crafting?!).
Just say “no more crooked sentiments” (unless you purposefully want it that way).
What Is the Stampin’ Positioner—and Why Does It Matter?
A stamp positioner is one of those tools you don’t need to make cards… but once you use one, you wonder how you crafted without it.
The Stampin’ Positioner helps you:
Line up sentiments precisely (no more crooked sentiments)
Re-stamp lighter images for deeper ink coverage — or if it doesn’t stamp perfectly the first time
Place images exactly where you want them, especially on layered designs or die cuts
Feel more confident when stamping directly on finished card fronts (a real game changer!)
This tool removes a huge mental hurdle: the fear of messing it up at the last step. For experienced crafters, it can also speed things up — especially if you’re doing mass production (Christmas cards, anyone?).
In short: fewer do-overs, less cardstock waste, more fun crafting!
Who This Stampin’ Up! Canada Starter Kit Special Is For
This promotion is ideal if you:
Are newer to cardmaking and want tools that reduce frustration
Love technique-based crafting and clean results
Want to stretch your supplies further with fewer mistakes
Are curious about teaching, sharing, or crafting more intentionally
Already buy Stampin’ Up! products and want the demonstrator discount
And yes—some people join purely for personal crafting savings and access. Others enjoy community, classes, or eventually sharing tutorials. There’s room for all of that, at your own pace.
A Quick Note
I always like to say this clearly: there is flexibility as a Stampin’ Up! Canada Demonstrator. Some join to earn some extra pocket money. Some join to get their own crafting supplies at a discount.
Everyone enjoys getting early access to products, and the chance to be part of a creative community and learn from other Demonstrators and Demonstrator Events.
Stampin’ Positioner Starter Kit Special – February 3 – March 2 – Exclusive Stampin’ Positioner included – Available only to new demonstrators
Thinking About It? Here’s Your Next Step
If this promotion has you curious—even just a little—I recommend taking a look at what you’d put in your starter kit if there were no pressure attached. What tools would make crafting easier? What stamps or papers would you reach for first? You get $165 CAD worth of product of your choice for just $135 CAD — with no shipping charges and no harmonized tax.
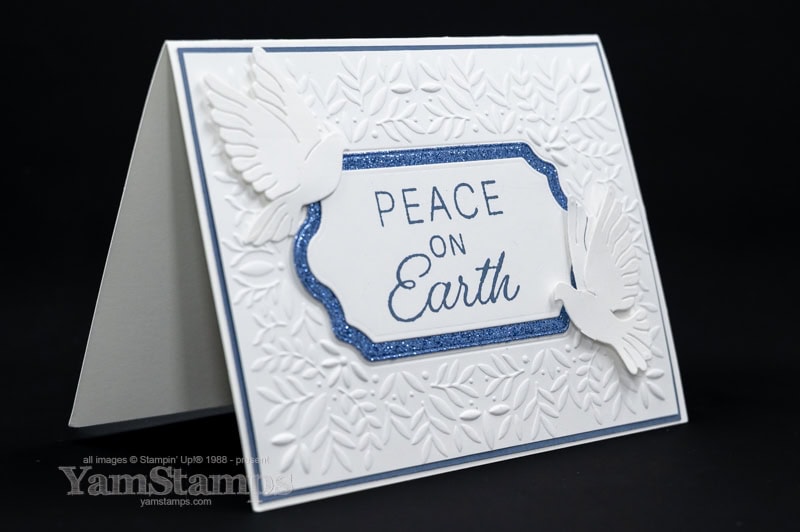
A Nature-Inspired Handmade Card with Stampin’ Up! Canada’s Nature’s Symphony
Today I’m sharing this nature-inspired handmade card that I created for a recent Stampin’ Up! Canada Demonstrator only card swap. I love the Nature Walk Suite and how calming the colour palette is! I’m double dipping and using this card for a blog post as well as for the Sunday Swap Share, so I’ll let you know now that the fully linked supply list will be on the YamStamps.com Sunday Swaps Page on Sunday!
Nature-Inspired Handmade Card – Nature’s Symphony and Nature Walk
I was happy to be able to present this Suite at a Demonstrator-only event late last year – these products are definitely my style! For this botanical card, I die cut multiples of the leaves from the Natural Hues Textured Specialty Paper, and then laid them out on the card front. Layered card designs are always eye catching and I think added depth makes it more professional looking. The background layer is from the Nature Walk Designer Series Paper and coordinated with the calming tones in the die cuts. This is another one of those cards that could be used for many different occasions – just change out the sentiment!
I was really happy with how this one turned out – I think it’s a good example of elegant cardmaking – nothing too over the top and not too “in your face”…I hope it can act as some cardmaking inspiration for you! Full supply list with links will be on the Sunday Swaps Page…on Sunday. If you’re looking for more handmade card project ideas and inspiration, be sure to be signed up for the weekly YamStamps newsletters, and check out theYamStamps Facebook and Instagram Pages as well!
Bonus Days are back! From now until February 2, with each increment of $60CAD in product order (before shipping/taxes, after any discounts), you’ll earn a $6CAD coupon code to use Feb 3-28! There is no limit to how many coupons you can accumulate! Click here or on the image to start shopping – or message me if you’d like assistance placing your order.
New Product of the Month!
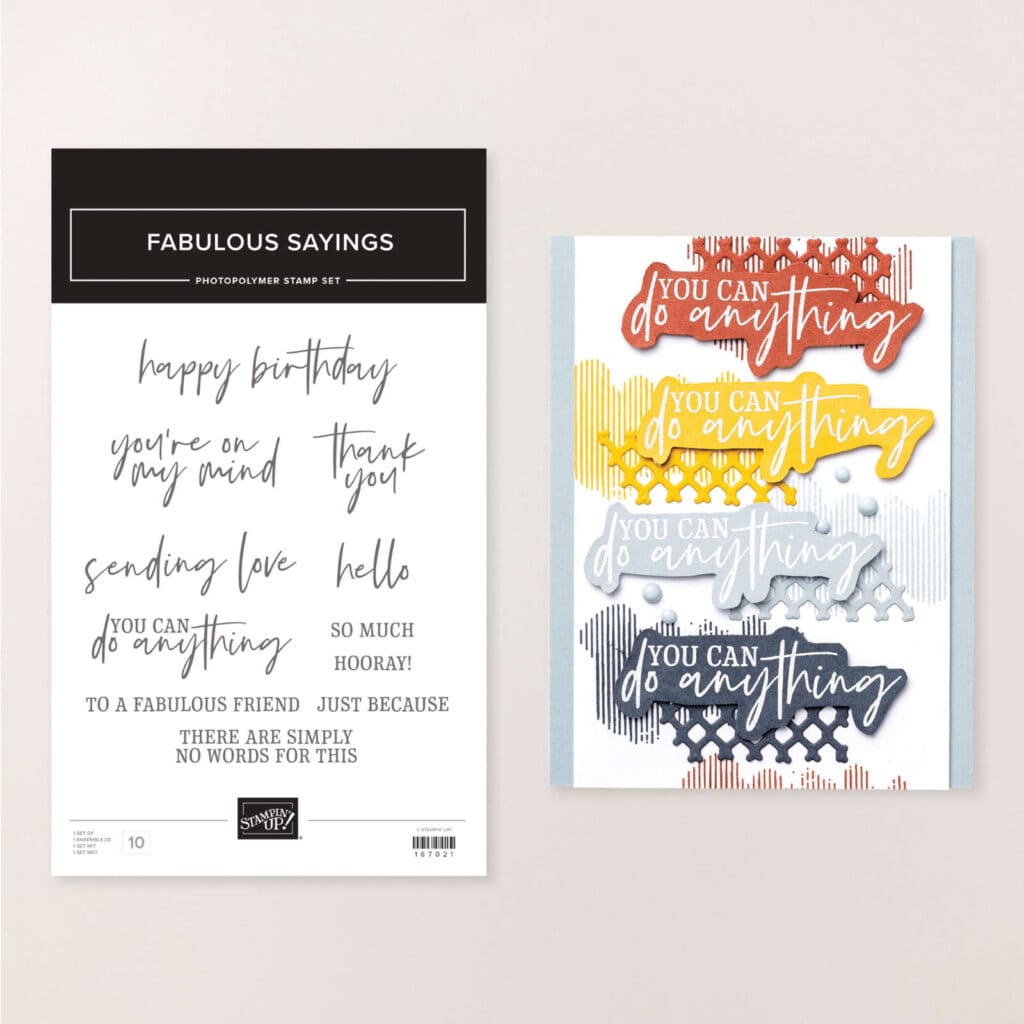
When you order $100CAD worth of product (really, make it $120 to get an extra Bonus Days coupon….), you’ll have the opportunity to purchase the Product of the Month for just $5CAD! January’s product is the Fabulous Sayings Stamp Set – a great collection of sentiments for all your paper crafting!
Please note that if you make a qualifying purchase in January but did not purchase the December Product of the Month (the True Blue Designer Series Paper) – you will have the opportunity to choose which Product you’d like to purchase (while supplies last). If you did not purchase the December Product of the Month and supplies are still available, if you make TWO separate qualifying orders (so two orders with $100CAD product) during January, you will have the opportunity to purchase one of each Product of the Month (December and January), if supplies are still available. You can only ever purchase ONE of a particular Product of the Month (so only one of December’s, and only one of January’s). Questions? Contact me.
Last but not least….
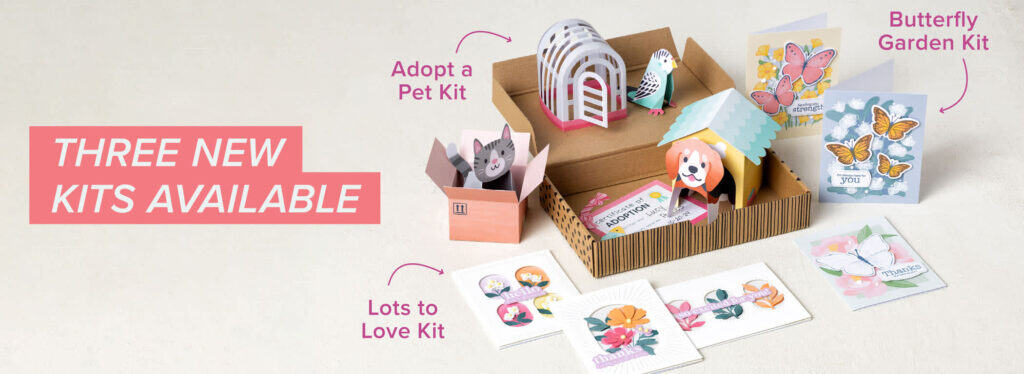
New Kits available!
Three new paper crafting kits are available! Two for creating cards, and a cute 3D kit featuring easy to care for pets! Click here or on the image above to check out all the currently available kits.
Wishing you and yours the very best of the season from me and mine!
I always appreciate a moment of calm amongst the chaos that can be the holiday season to take a moment to reflect back on the year and look forward to the next.
Thank you for supporting my small business – by buying paper crafting products through me, by purchasing an online class, by subscribing to my newsletter or visiting my social media and website in this busy world! Wishing you all the best of the season and looking forward to continuing to bring you crafting ideas and inspiration into 2026 and beyond!
As everyone in Canada recovers from Game 7, I’ll take you back to Game 1!
I am very thankful that the clocks turned back over the weekend – because I needed that illusion of extra sleep after that rollercoaster known as World Series Game 7. I am typically one of those sports fans that gets more interested as we get into the playoffs and championships, and when the “home team” is involved, it’s even more exciting! Not the outcome that we had hoped for though….
I had the opportunity to take part in the opening ceremony for Game One of the World Series in Toronto, and I am so grateful that I was able to say yes! (Thanks to having some job flexibility and supportive management – in my day job, as well as my side hustle here!). As a youth, I was a member of the Burlington Teen Tour Band, and the casting organization for the opening ceremonies reached out to the band to get participants. The catch was that participants had to be at least 18 years old, and since it’s the “Teen” Tour Band, many of the members were too young, so the invitation was sent to alumni of the band. My son and I both said yes, but in the end, he wasn’t able to participate due to a scheduling conflict. I was still able to participate, and met up with fellow alumni plus a whole bunch of other people with marching and performing experience for the event.
Porch selfie at 530am…. after our first rehearsal Wednesday evening, we had to be at the film studio (our home base) for 7am the next two days in a row. Thankfully I was able to carpool with a friend (thanks Brent!) who had a large vehicle and fit 7 of us in! Rehearsals were a lot of standing around while logistics and positioning were figured out, plus more waiting to get our costumes.
We practised and refined our positioning on Thursday, and then during the Friday dress rehearsal they decided to have us stand behind the Voices of Fire choir during their songs (and the player introductions!!). It was cool being up close, on the dirt in the infield and so close to where the players were going to be! It did require some extra rehearsal so that we could somewhat be in sync with the choir movements. We got to sing along (as much as we could) with the choir, but thankfully the mics were pointed at the choir members, not the wannabes!! I didn’t know much about Voices of Fire before the game, but I’ve become a fan – they’ve got incredible voices and energy.
Photo from dress rehearsal…because there was a LOT of waiting around
The jumbotron screen is a perfect backdrop! You can see the in ear monitors (not in my ears at the time….). They played the tracks through it plus they could give us instructions, like to hold our pose in the Canadian flag, and then when we could leave.
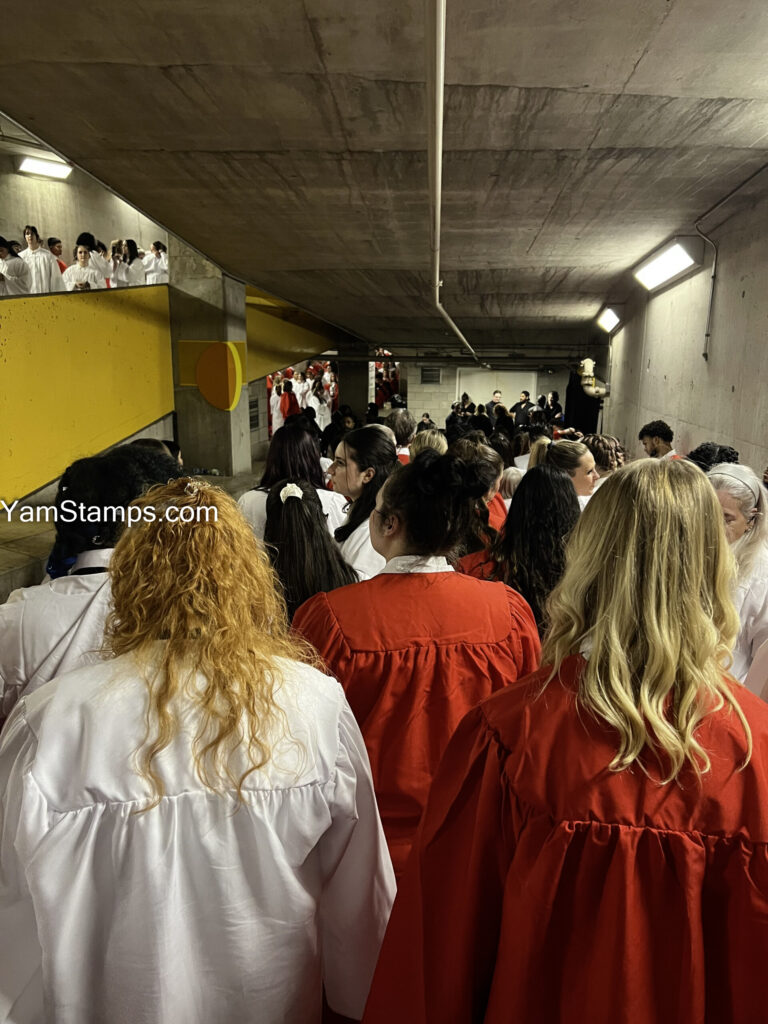
waiting on the ramps before our big entrance
By the time we actually got to game time, we were all pretty tired, but there is nothing like hearing and seeing a capacity crowd to help the energy levels!!
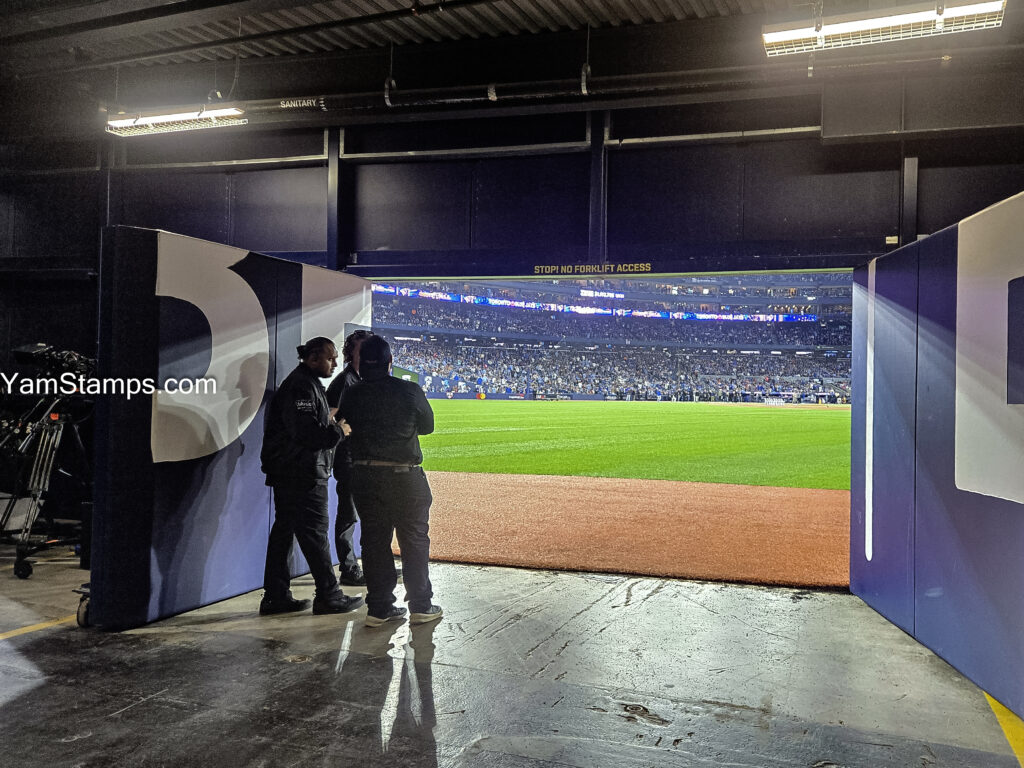
photo of the field before our entrance (courtesy of one of my other on field castmates)
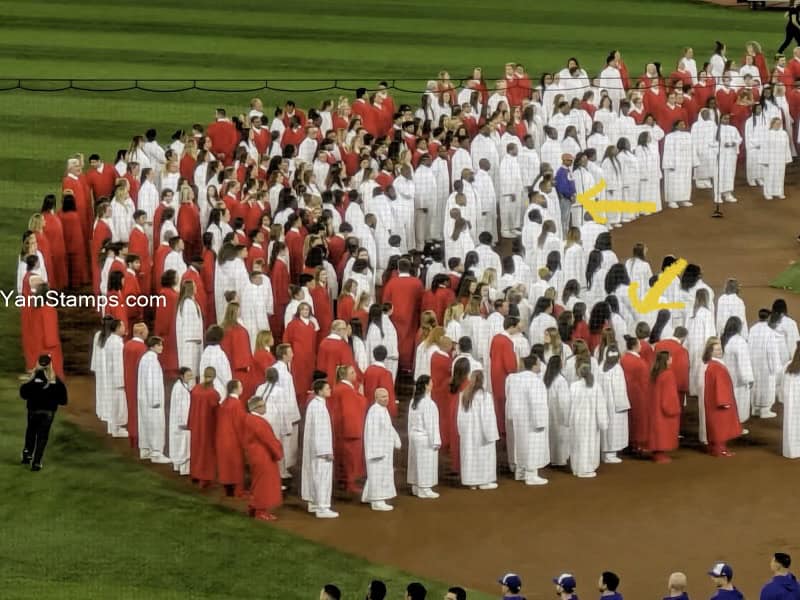
My brother got a screen grab – that’s me in the red gown behind the choir members! We got to sing and dance along – that was a lot of fun.
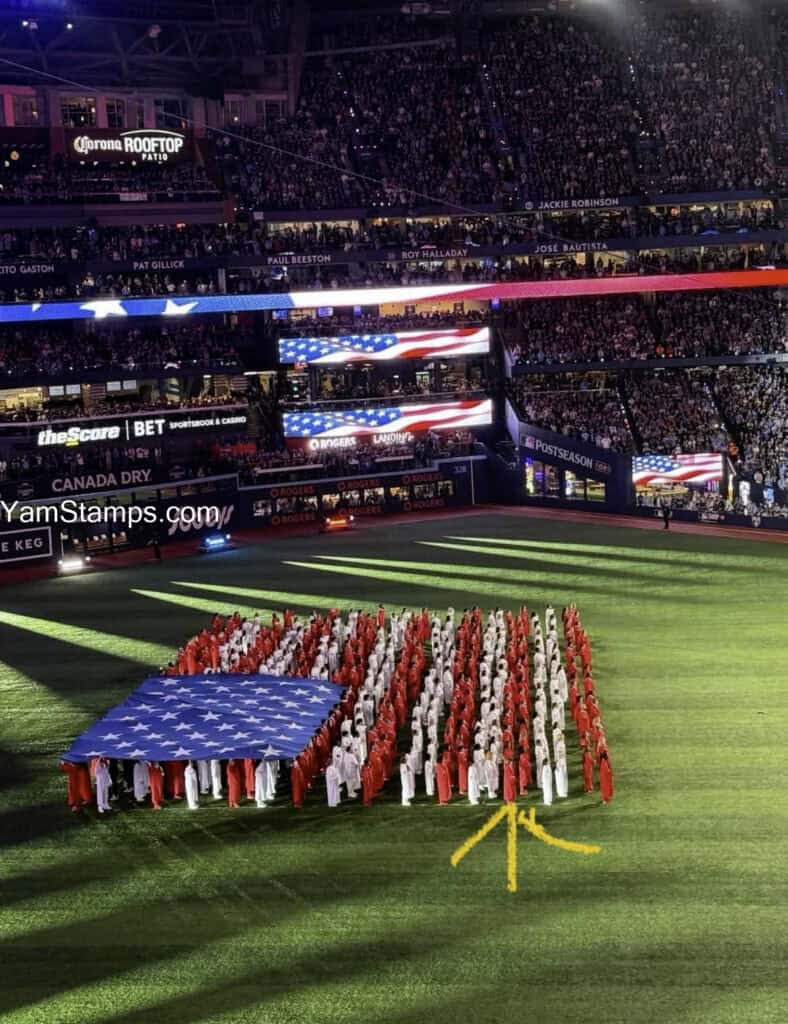
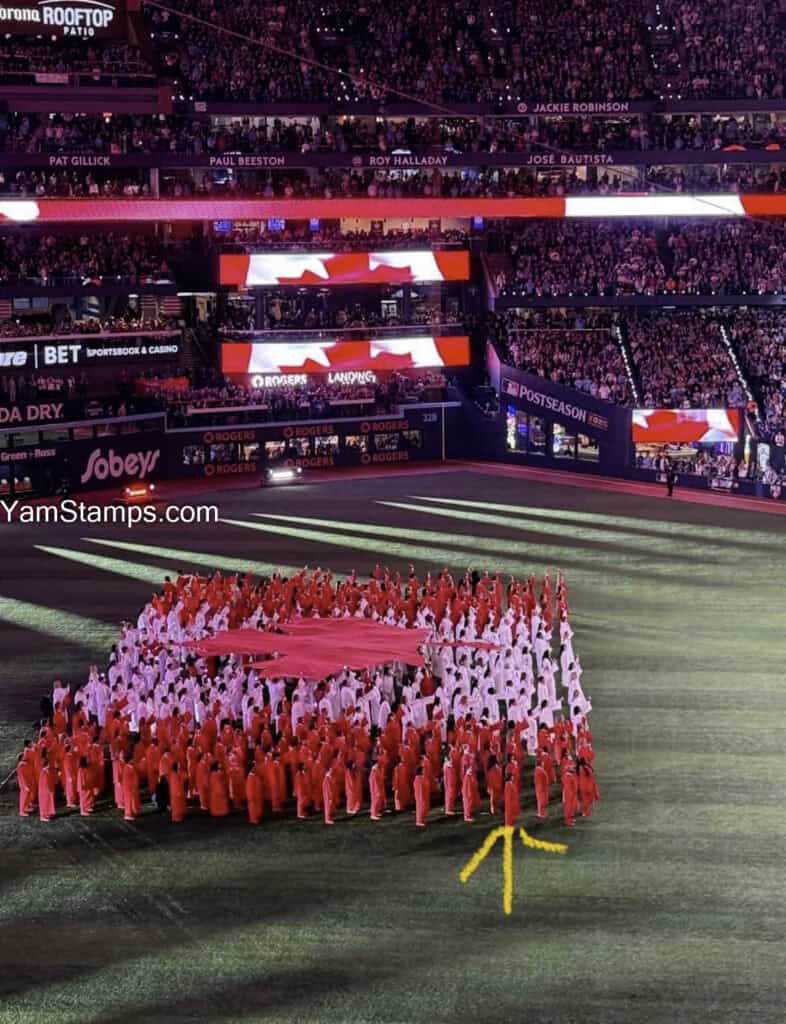
Photo from a friend in the stands (Thanks Mary Anne!) dorky arrows pointing out me and Pharrell Williams!
More photos from MaryAnn with me pointed out 🙂
Being on the field hearing the cheers and the crowd singing O Canada is something that I won’t soon forget! I’ve seen videos of the opening ceremony since then and am amazed at how great it looks (we couldn’t really get a good feel when we were on the field)!
Before you ask, NO, we didn’t get to stay and watch the game. Once we finished, we were bused back to the film studio where they had some food for us. We wrapped up, got into our regular clothes and headed home. On the plus side – we listened to the game on the way home and there was NO traffic!! Home in time to watch the end of the game (just barely, I dropped into bed and fell asleep!).
Admittedly – I am a fan of both of the teams that were in the World Series….but the home team will always have the edge when they’re in head to head competition, so game 7 was a tough one. I am truly grateful that I had the chance to be part of this unique presentation! Since I am a paper crafter, at some point in time, I WILL get around to doing some scrapbooking/photo journalling of this whole experience!!
(and now, back to our regular programming…..watch for paper crafting entries next!!)